The shoot process from start to finish
For a majority of people, a photoshoot isn’t exactly a regular occurrence, and the process from start to finish isn’t a very well known one. And if you’re anything like me, you like to know more of the details of how something is going to work before you commit to it, so in this month’s blog, I’ll be taking you through the shoot process, from initial enquiry, to wall art delivery, outlining each step, as well as rough time frames.
Step 1: Booking
The first part of the process, is that first point of contact to enquire about booking in for your shoot, and I say point of contact because there’s a few ways you can reach me. You can send me a message on either Instagram or Facebook, you can give me a call on 07949 306 857 (Because I know some people like to chat in depth over the phone about these things), you can send me an email at skylimitphotography@gmail.com, or you can fill out the contact form here (The most straightforward option in my eyes!).
Whichever way you decide to contact me, you’ll need to include the following details:
• What kind of shoot you’re interested in - did you want a portrait shoot, a horse and rider shoot, or do you need commercial images?
• How many horses you want to be photographed - Each package is priced for one horse/ one horse and rider combination, additional horses cost extra because that’s adding is a considerable amount more for work me to deliver, so it needs to be accounted for.
• The location you’d like to shoot at - is this your horse’s yard? Or a location which you really like the look of? Please include a full address so I can get you an accurate mileage quote to keep clear on what you're final shoot cost will be - if you’re within 20 miles of me you’ll qualify for free mileage!
• If you have preferred dates or a month you’d like to shoot in/on, and if weekdays or weekends work better for you - This helps me give you dates that are more relevant to you and save on backing and forthing with emails. I have a set number of shoots I do per month, so I have some more flexibility on dates to work around client needs.
• If there’s any additional information you think I might need to know - such as if there’s a particular shot you’d like creating, or if you want to do multiple locations, or anything that you’d like to add in.
All of this means I can get back to you with all the relevant information and reduce down the time it takes from initial enquiry to booking in a date.

Step 2: Deposits and Payment
For every single client, a £75 shoot deposit must be paid to secure their shoot date. Without a deposit, you don’t get your date and it can and will be offered to other clients. This might seem a little harsh, but at the end of the day, this is a business and I need to have measures in place that ensure dates are committed to.
Once your deposit is paid, then I’ll ask you how you’d like to pay for your remaining shoot balance, and for this, you have 2 options:
1. Lump sum - you pay off the remaining balance in one hit, then it’s all handled and you don’t have to think about it again.
2. Instalments - you choose how many instalment payments you’d like to pay in, and we split the final balance over that. The most popular option is 3 payments over 3 months, making it easier for you to cover the cost of your shoot in more manageable payments.

Step 3: Getting excited/ Top tips!
So now you’re shoot is booked and paid for, it’s time to get excited for your shoot! If you’ve booked a horse and rider shoot, then spend some time thinking over which outfit(s) you’d like to wear for your shoot. With planning ahead, you’ll have the chance to buy anything extra you’d like for your shoot in plenty of time.
Another extremely helpful thing you can do for whatever shoot you have booked, is spend some time working with your horse on standing still. A horse that knows how to stand when asked is much easier for everyone involved, and whilst I understand some horses are truly just big old fidget bottoms, a bit of clever clicker training goes a long way in making life with your horse a little bit easier, not just for a shoot!

Step 4: Shoot prep on the day
The day of your shoot is such an exciting one - it’s finally here and happening! Ahead of your shoot, make sure to have your horse ready in plenty of time. If you’re bathing him, do this either the night before (Especially if you have a morning shoot!), or a good few hours ahead of your shoot time to ensure he’s completely dry.
Give yourself more time than you think you’ll need, this way, should anything go wrong, you’re not stressed and rushing around (Which your horse will most certainly pick up on), and you’ll have enough time to get all the extra bits done which will definitely take longer than expected (It’s always the way!).
Have any tack you’ll be using (Headcollar, bridle, saddle, etc) clean and ready, if you’re wearing multiple outfits, have them easy to access. And if you’re doing your hair and makeup, I recommend doing this AFTER bathing and grooming, because no doubt you’ll end up wearing all the filth your horse had on him before you bathed him.
As I’ve already said, leave plenty of time so you’re ready to go when I get to you for our agreed upon time.

Step 4: Lights, camera, action!
When I arrive, I’ll take a moment to meet you and your horse in person (I love to have a quick cuddle with everyone’s horses!), and we’ll have a little chat about how the shoot will run. If it’s a portrait session, I’ll have a quick look at the indoor space we’ll be shooting in before setting up, and if it’s a horse and rider shoot or a commercial shoot, then we’ll have a look over a handful of spots to shoot at your chosen location to get an idea of how the shoot will run.
Once that’s done, I’ll start setting up my lighting and other equipment for the shoot, letting you know when we’re all ready to go. We’ll do a few light tests to gauge how reactive your horse is to my lighting equipment, taking all the time he needs to take it in and get comfortable with it - I will NEVER rush a horse on this part of the process, every horse is different and some need a considerable amount more time to take in what’s being asked and what’s in front of him. We will start when he is a ready and only then.
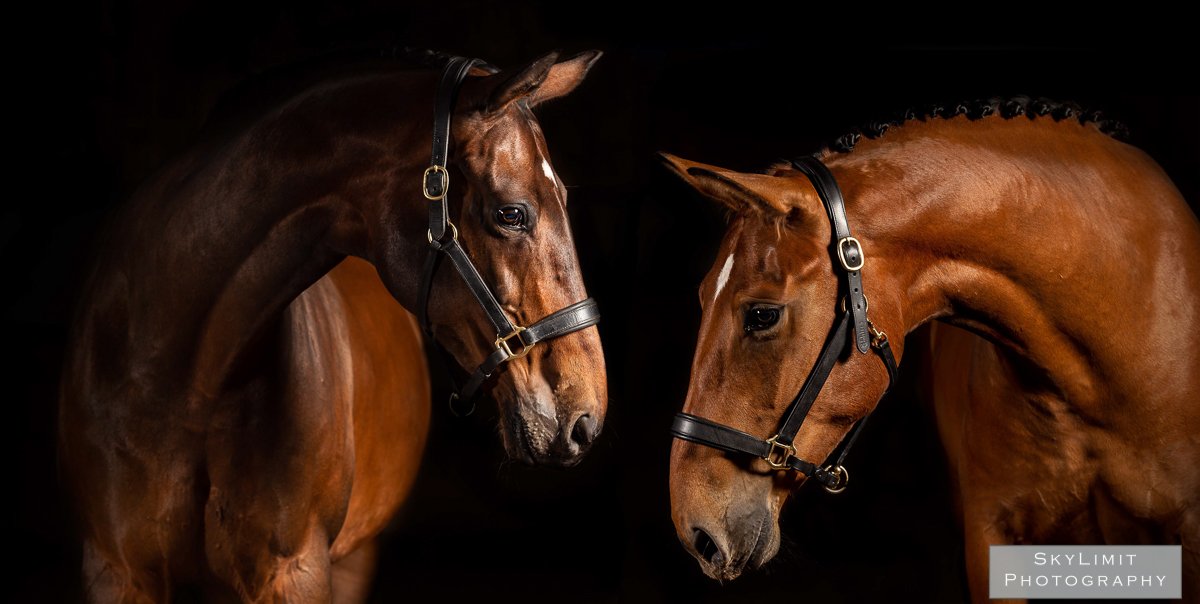
We’ll work through our various locations and poses, creating a selection of gorgeous images, always having a good laugh along the way - I’m a very bouncy, jokey person and always bring that to my shoots, they’re meant to be fun after all!

Step 5: Processing times and your viewing session
After your shoot, there will be a minimum 2 week wait on your images being ready, however depending on the time of year/how busy I’ve been with shoots, this can be all the way up to 6 weeks. Your images will receive the highest attention to detail during the editing process so when you receive the final images, it will be of the highest possible standard.
Whilst you wait, I’ll have given you a wall art price list to look over, giving you time to look at the wall space in your home for where you’d like to put any wall art pieces. This means when you come to your viewing session, you’ll be better prepared to know what you’d like.
Once your images are ready, I’ll contact you to arrange your viewing session, where you’ll be invited into the SkyLimit Photography office to get the first look at your photos on the big screen, giving you the full impact of what we’ve created together.
From there, you’ll have the opportunity to purchase any wall art you might like from the images we’ve shot, and I can give you expert guidance to help you make the choice that’s right for you.
It’s during your viewing that you’ll also receive your USB with all of your images as social media sized files.
Step 6: Wall art delivery
If you decided on any wall art pieces from your viewing, then I’ll put the order in on the same day or next working day with my suppliers.
Once the order is put through to the lab, it will be lovingly hand crafted locally, by expert framers and printers, and delivered direct to you.
Because this is a bespoke process and all done by hand, it can take up to 2 weeks to arrive, but the wait will all be worth it when you have a gorgeous professionally finished image of your horse to adorn the walls of your home with.
And that’s it, the shoot process from start to finish! So if you’d like to experience this first hand and have beautiful images of your horse that will last a lifetime, get in touch today via the options in Step 1 and let’s make it happen!